How to Setup WhatsApp Cloud API: Register your Phone Number and Get your Access Token

📱
Official Guide · Updated 2026

WhatsApp Cloud API Setup
for WinSender

An updated step-by-step guide to connect your WhatsApp Business number to Meta’s official APIs and start sending messages safely and at scale from your PC.

✅ No ban risk
✅ Official Meta APIs
✅ Servers managed by Meta
✅ Bulk sending from PC

💡 What is the WhatsApp Cloud API?

The WhatsApp Cloud API is Meta’s official solution for sending and receiving WhatsApp messages at scale. The servers are hosted directly by Meta, so you do not need to manage your own server. It includes automatic updates and a simplified setup process. Since 2025, it is the only supported method for direct API access.

📌 WinSender connects directly to this API: you can send bulk messages, configure auto-replies, and manage all conversations from your Windows PC without ban risks.

📋 What you need before you start

📧
Facebook account
An active personal Facebook account

🏢
Business details
Company name, website, and address

📱
Phone number
A number not already active on WhatsApp

💳
Payment card
Required by Meta to activate the API, even with zero balance

⚠️ Is the number already on WhatsApp? If the number is already registered on WhatsApp or WhatsApp Business, you must first delete that account from the mobile app, wait a few minutes, and only then proceed with API registration.

Step-by-step setup

Follow each step in the order shown. The entire procedure takes about 20-30 minutes.

📑 Quick index

➊ Log in to Meta for Developers
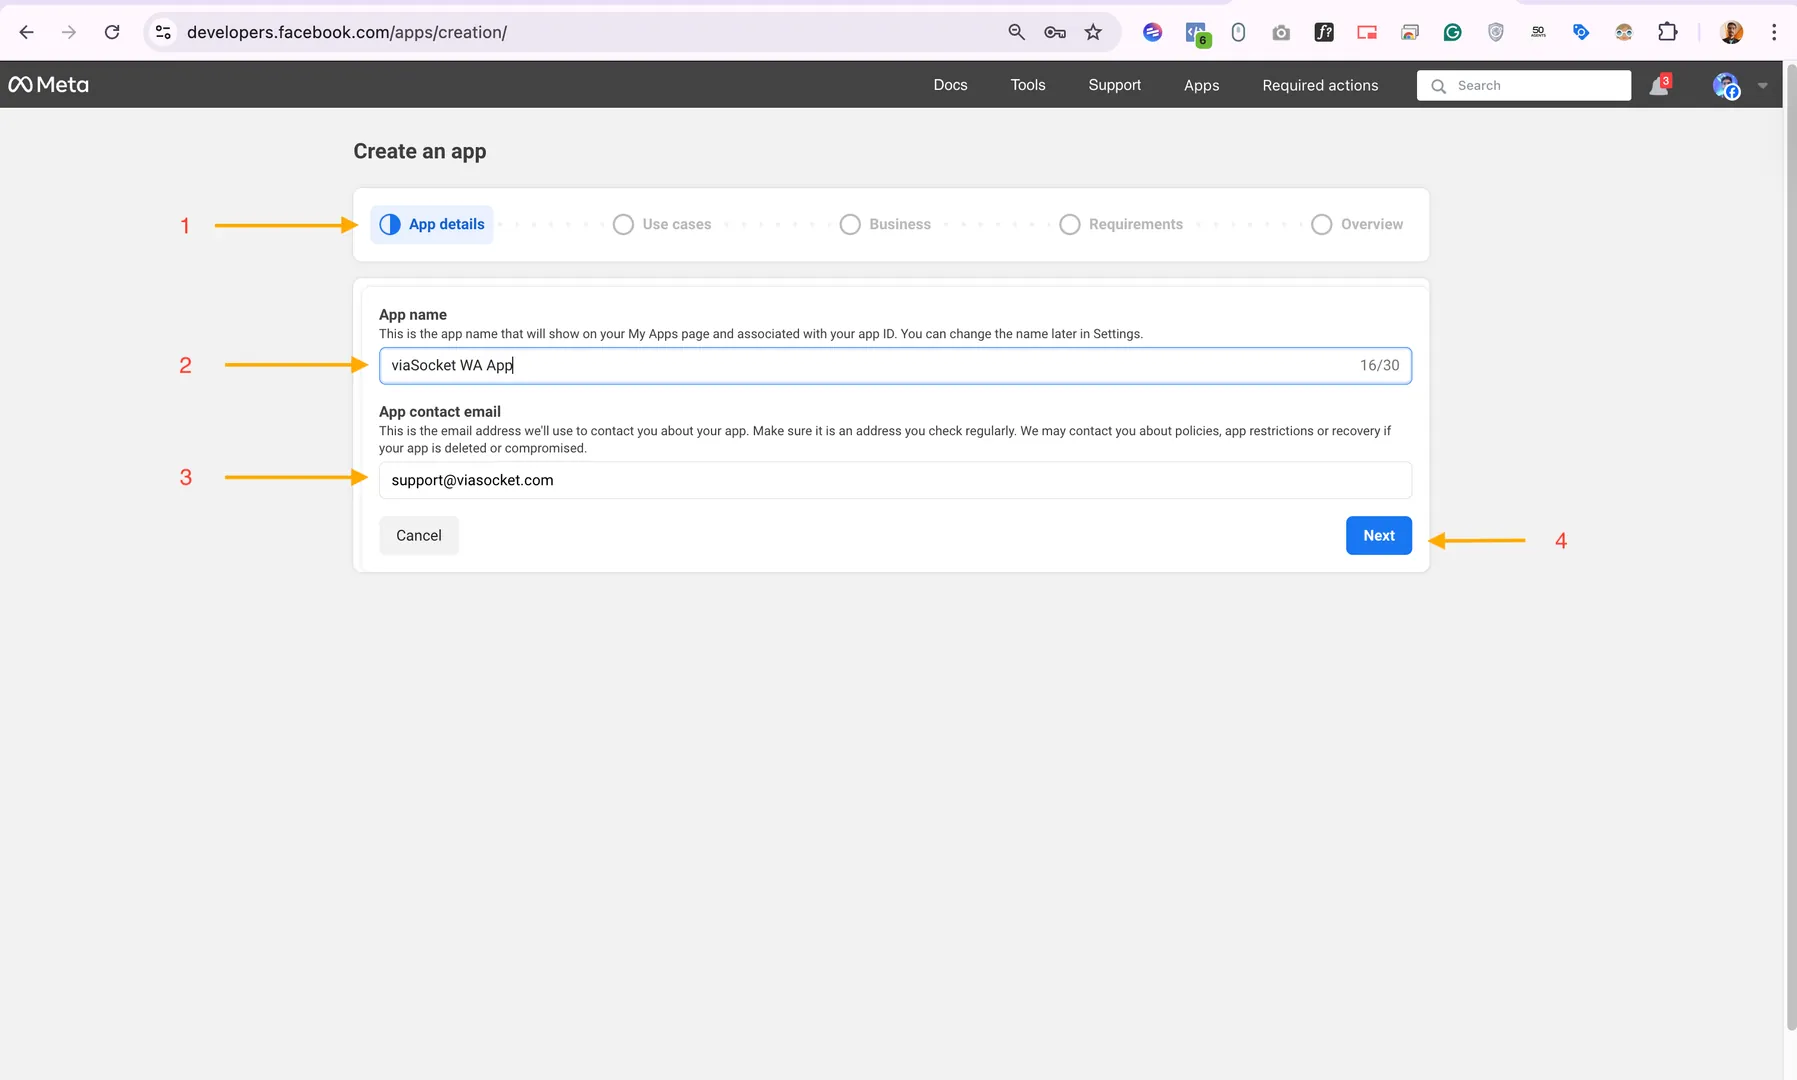
➋ Create the Meta App
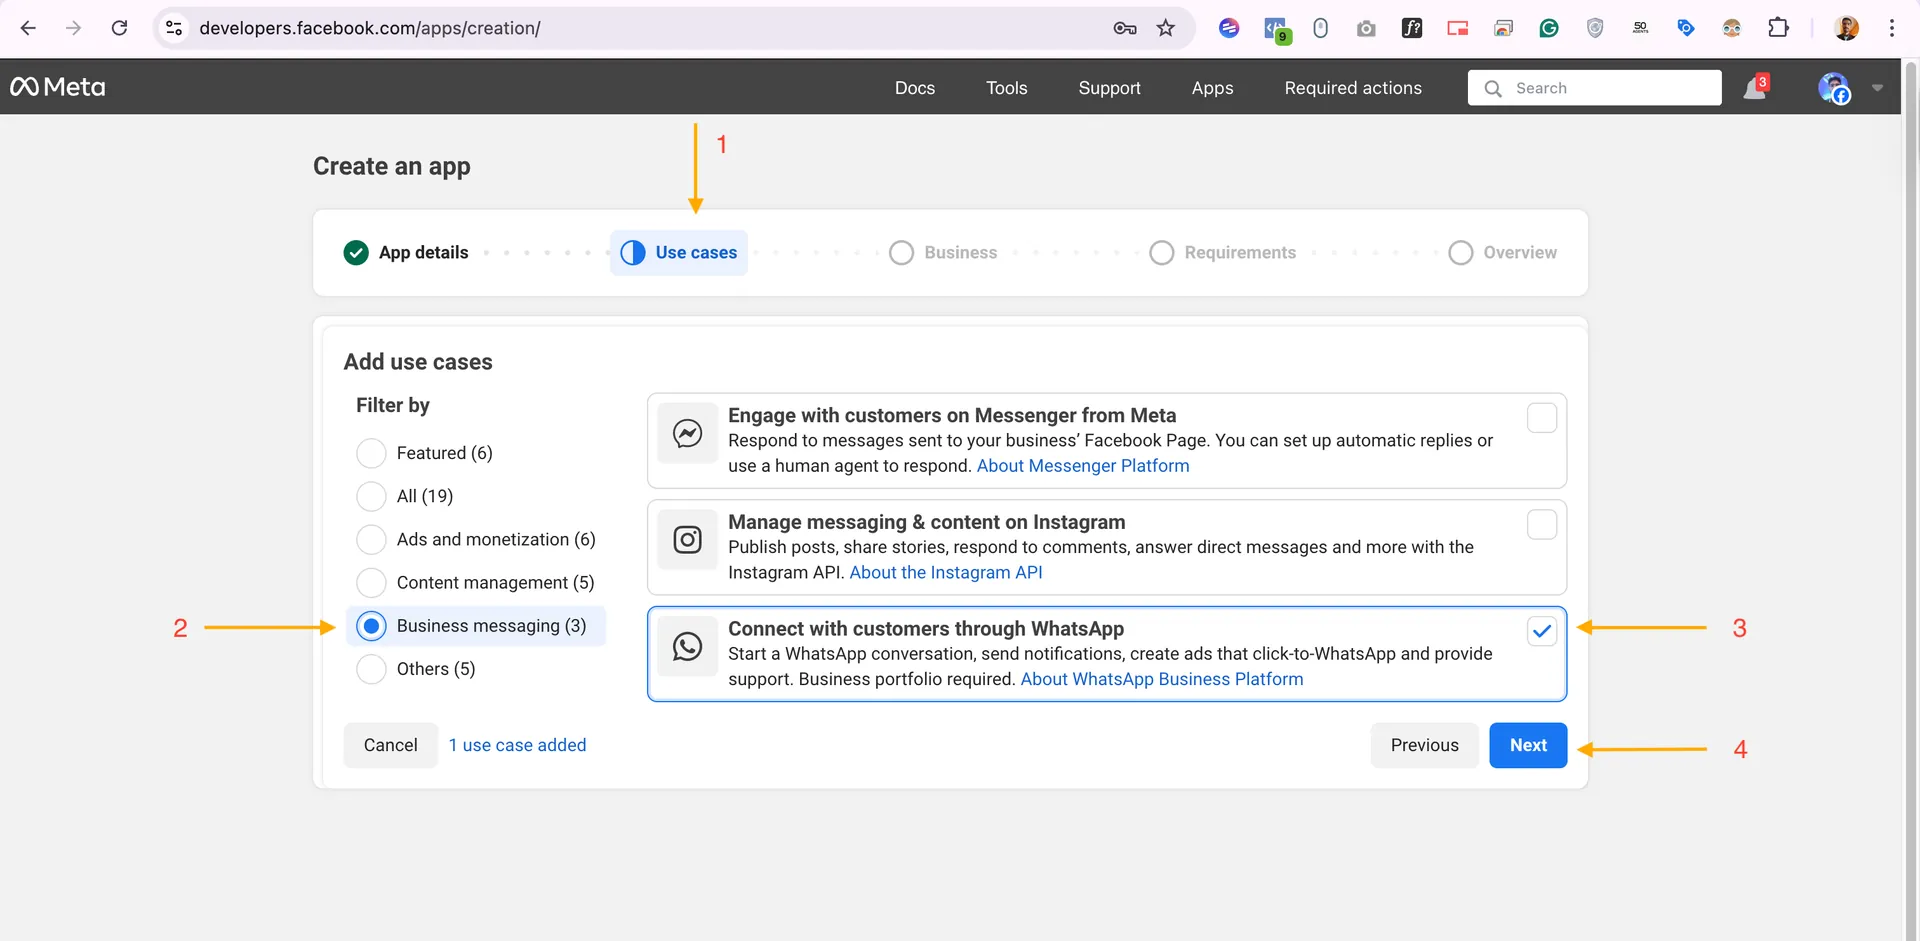
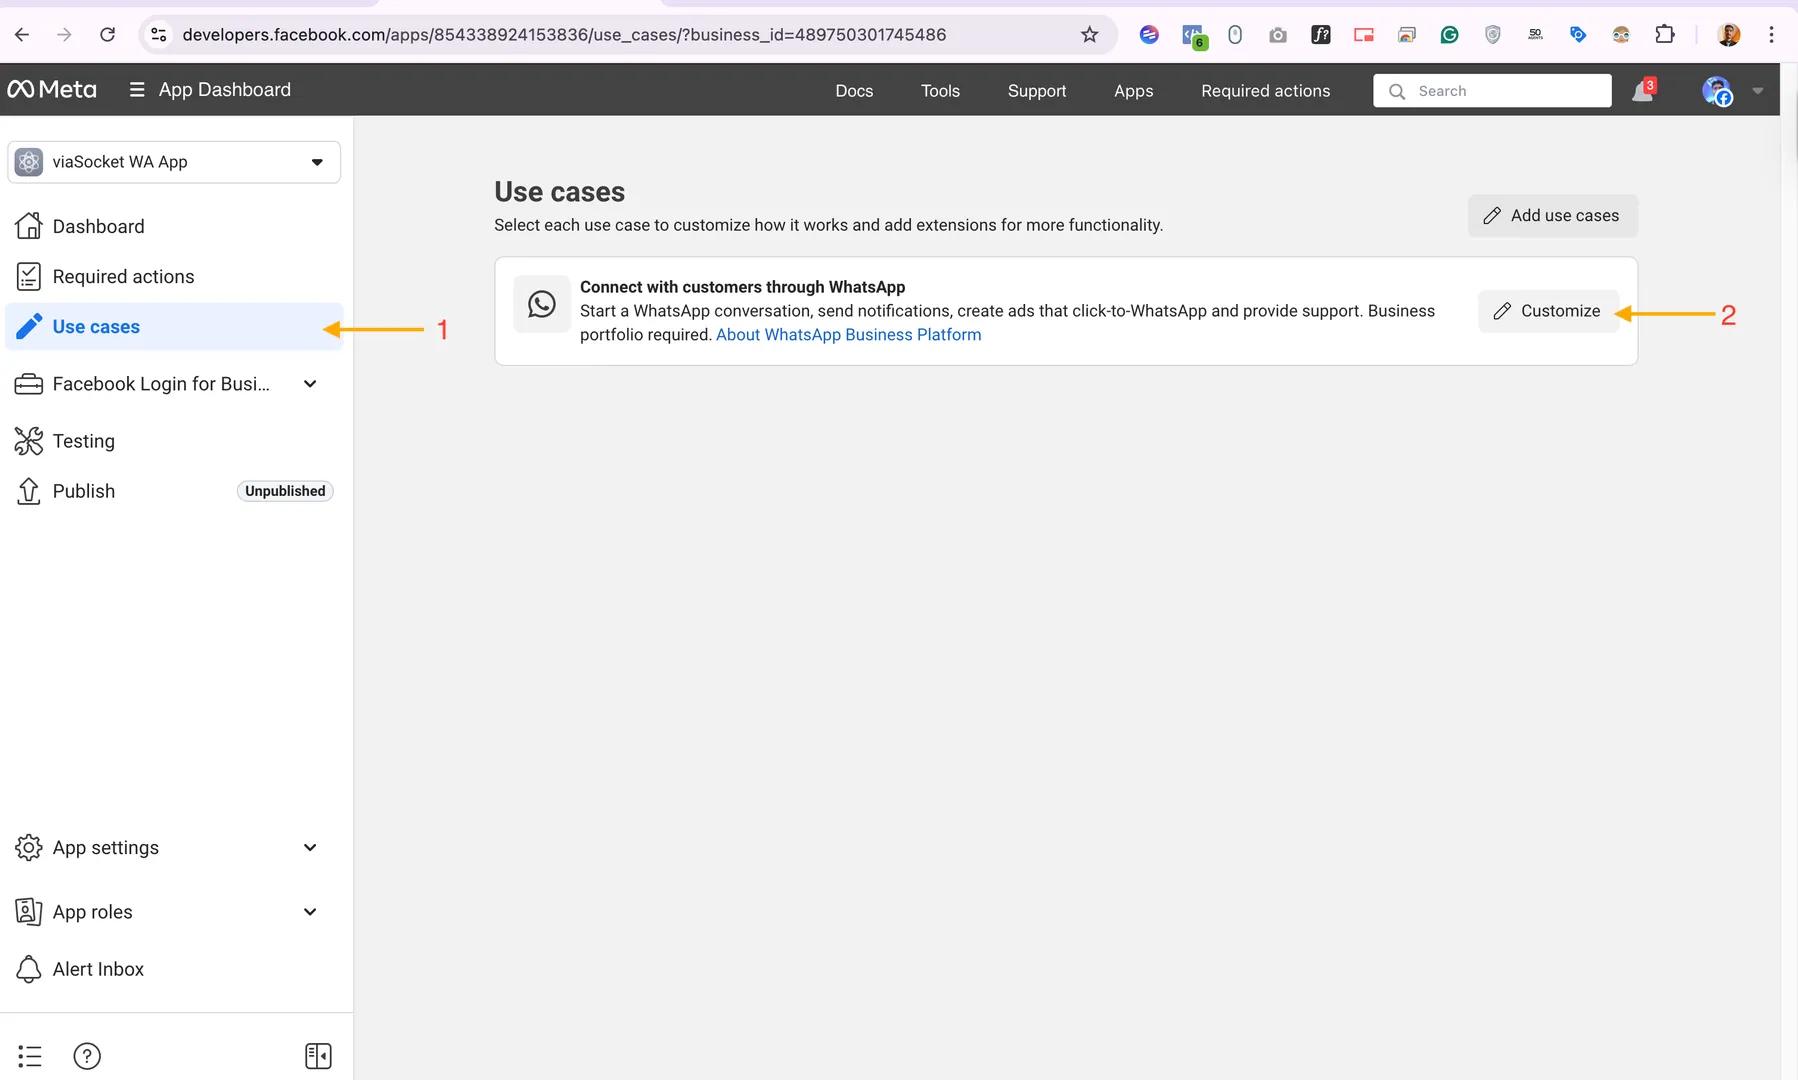
➌ Select the WhatsApp use case
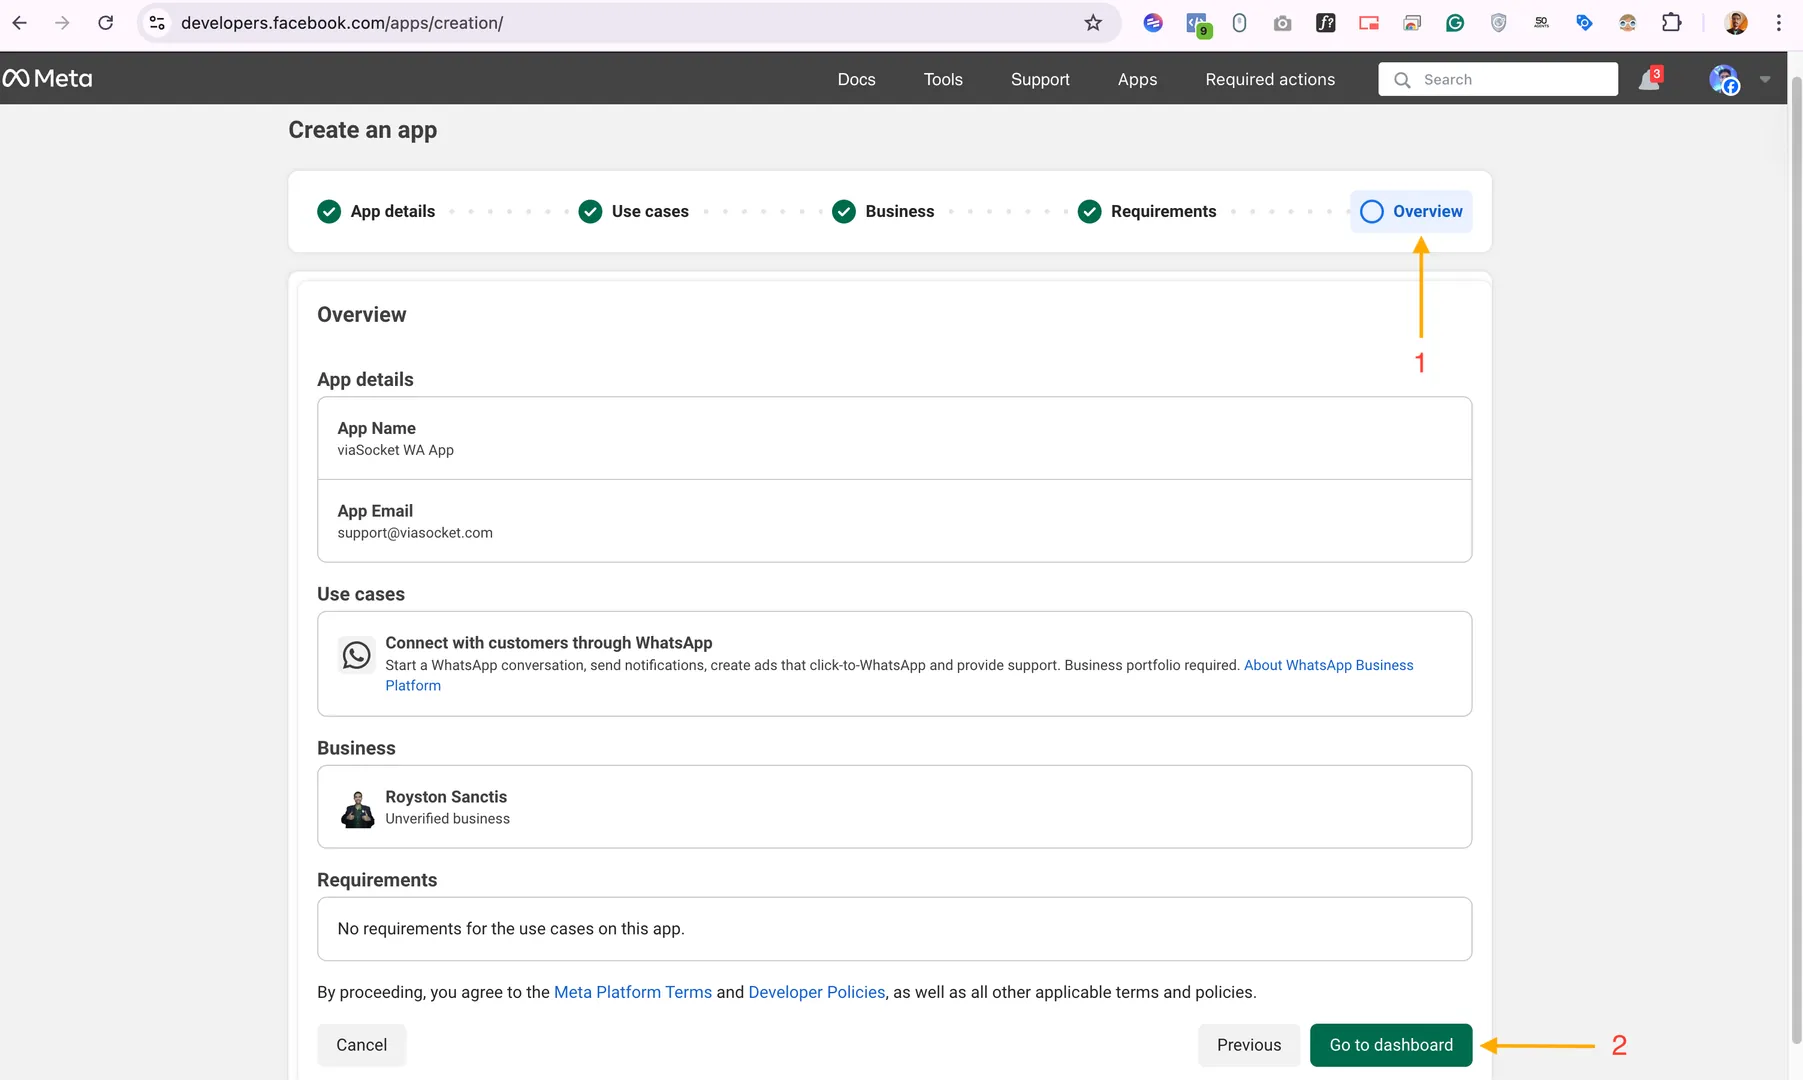
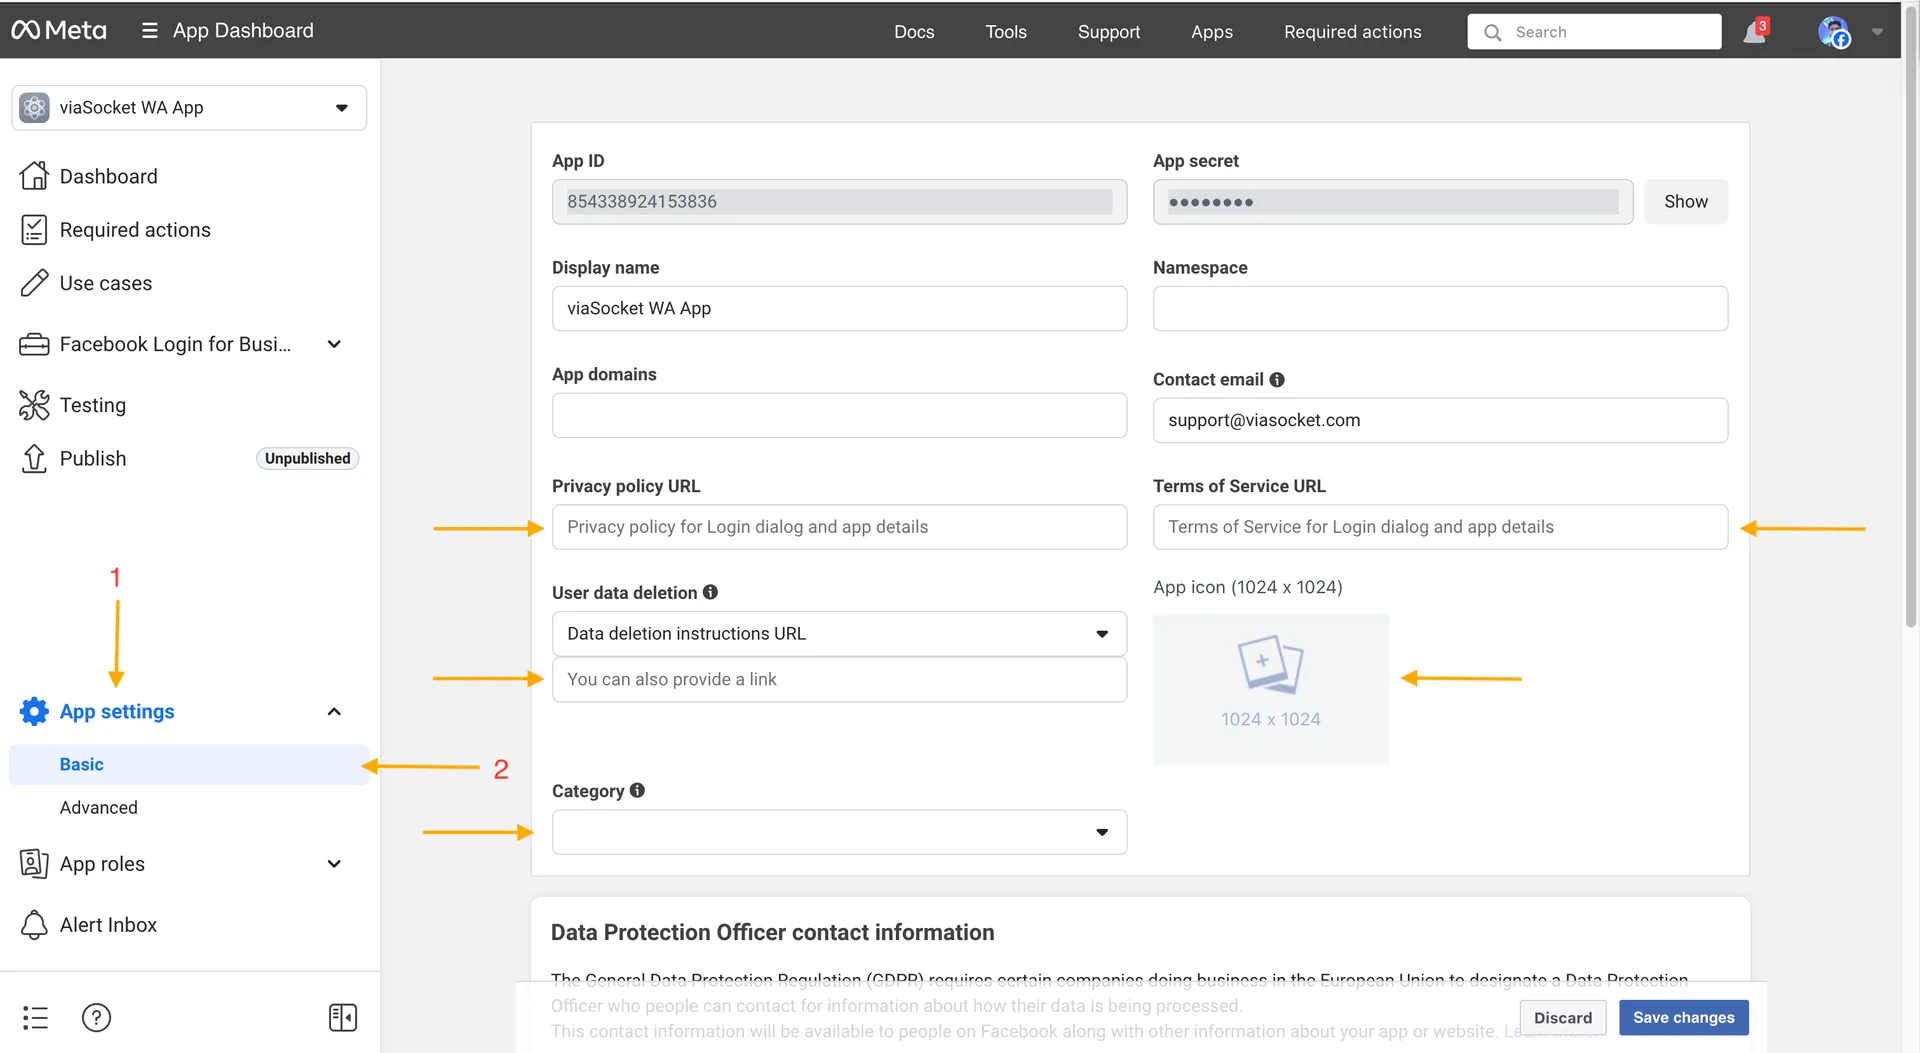
➍ Complete app settings
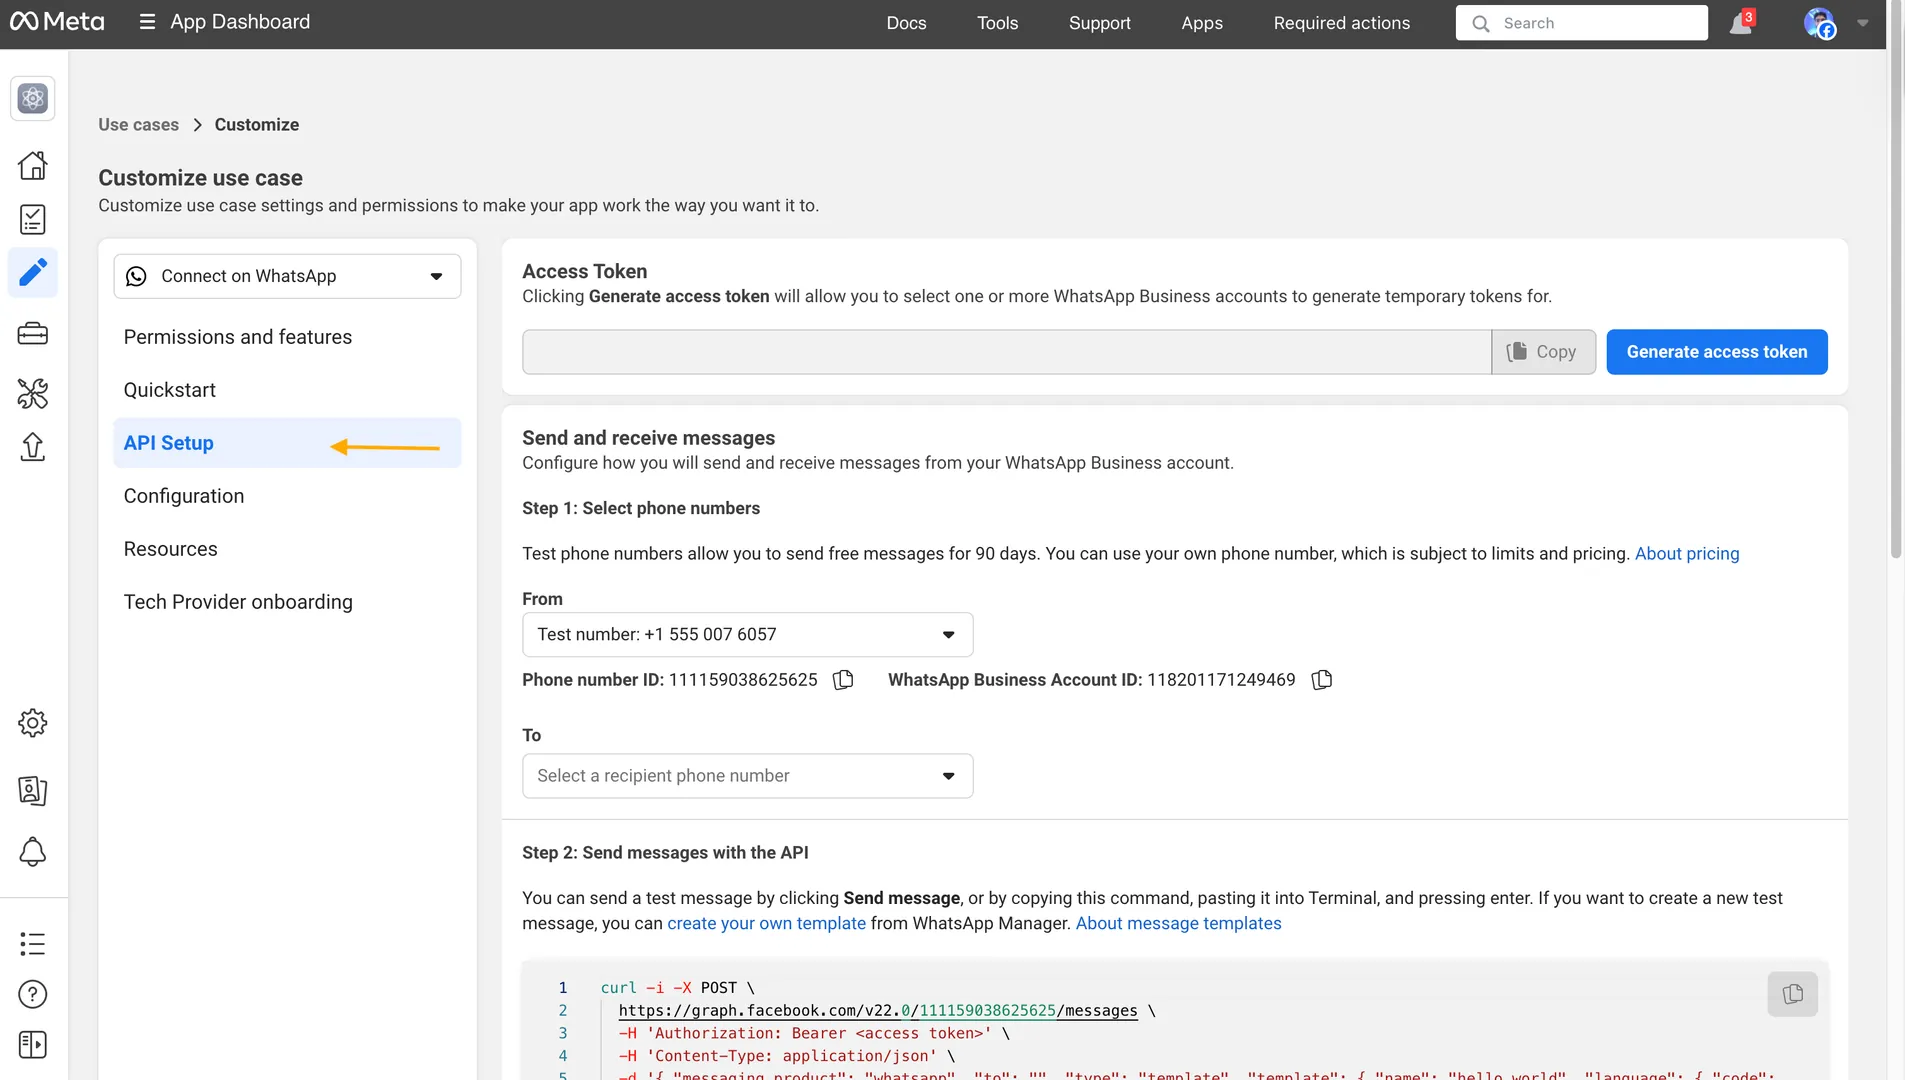
➎ API Setup panel
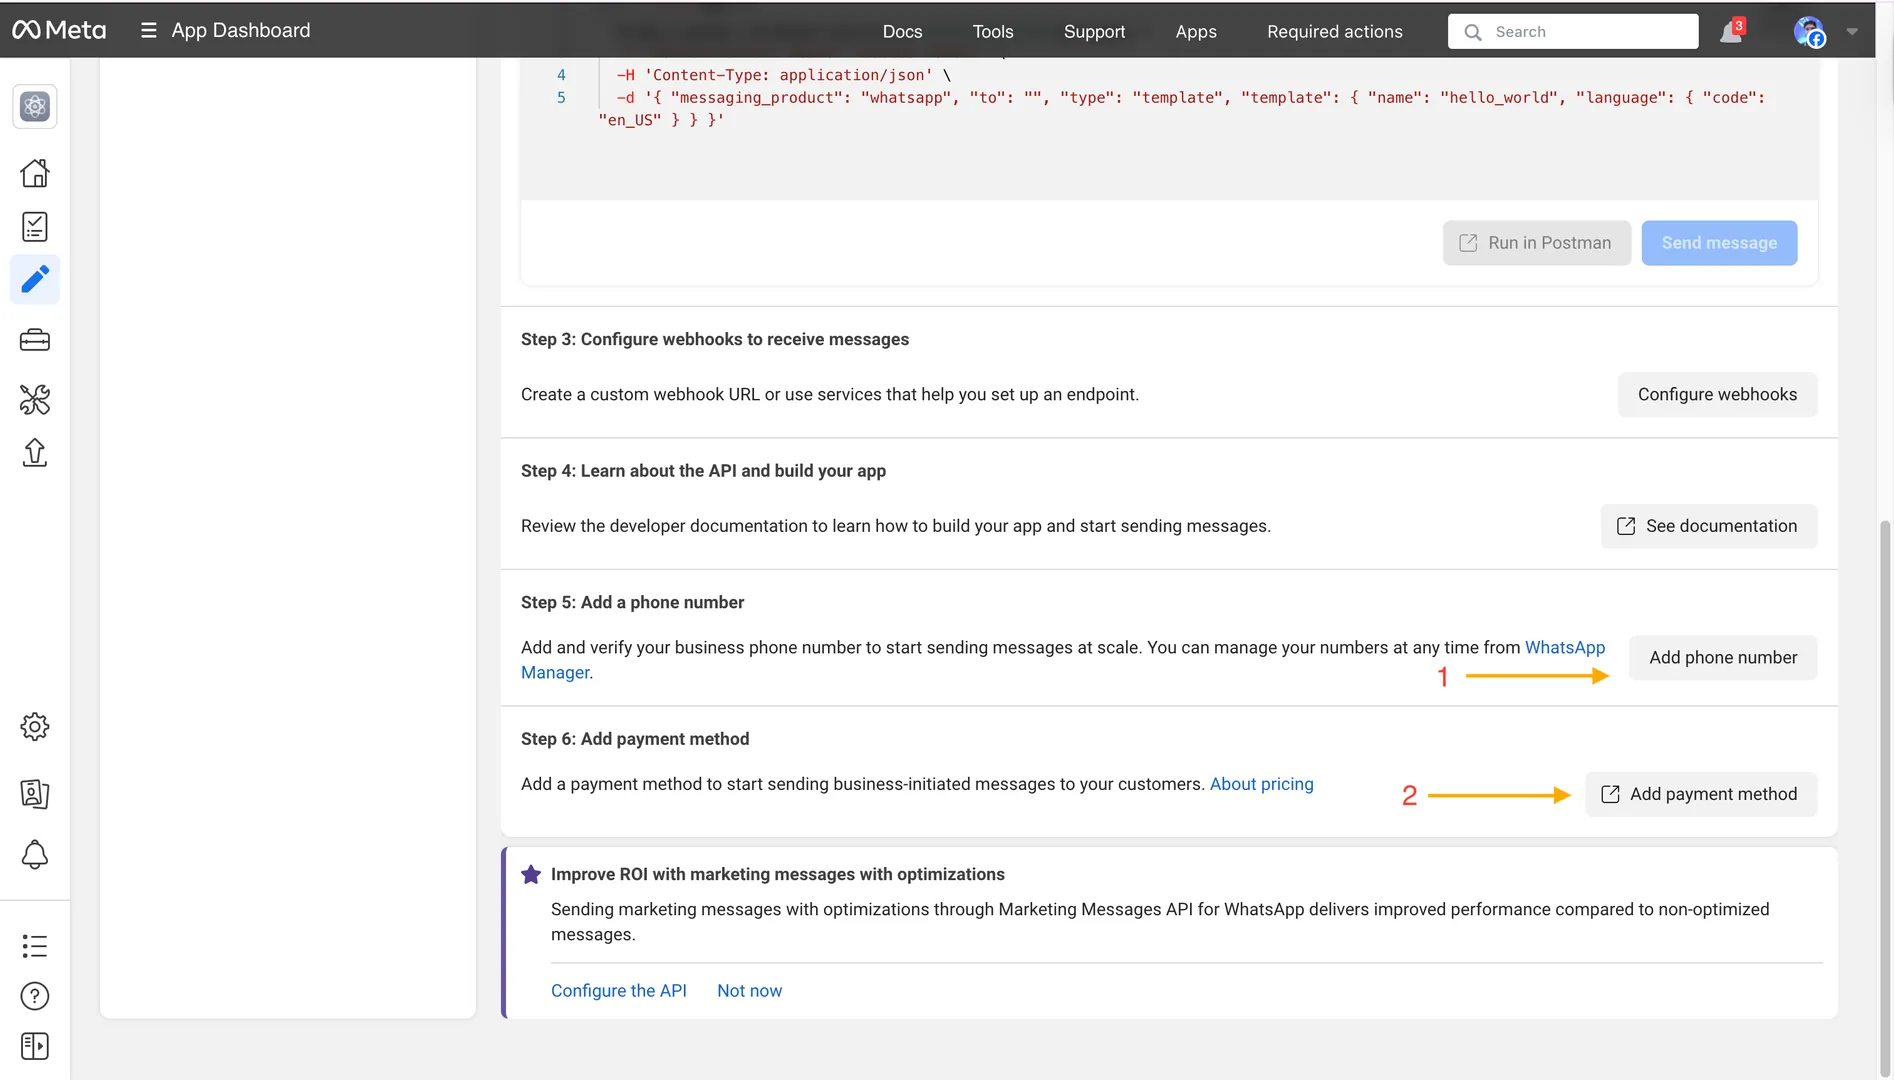
➏ Add a payment method
➐ Register your real phone number
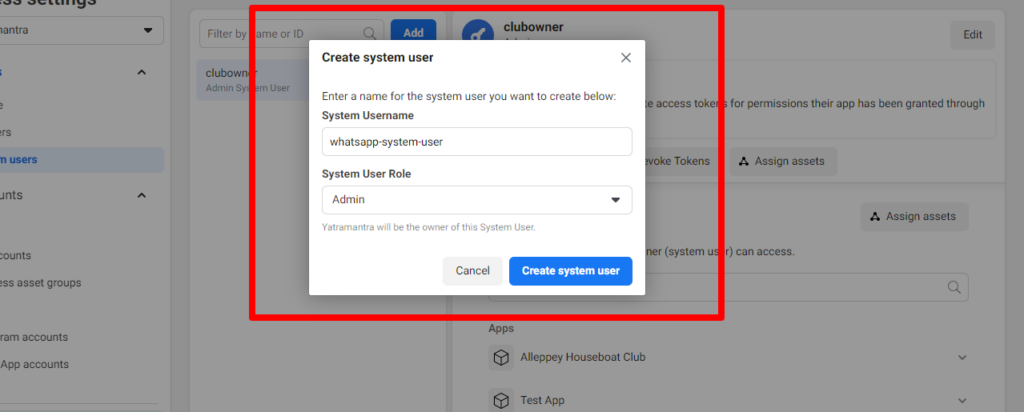
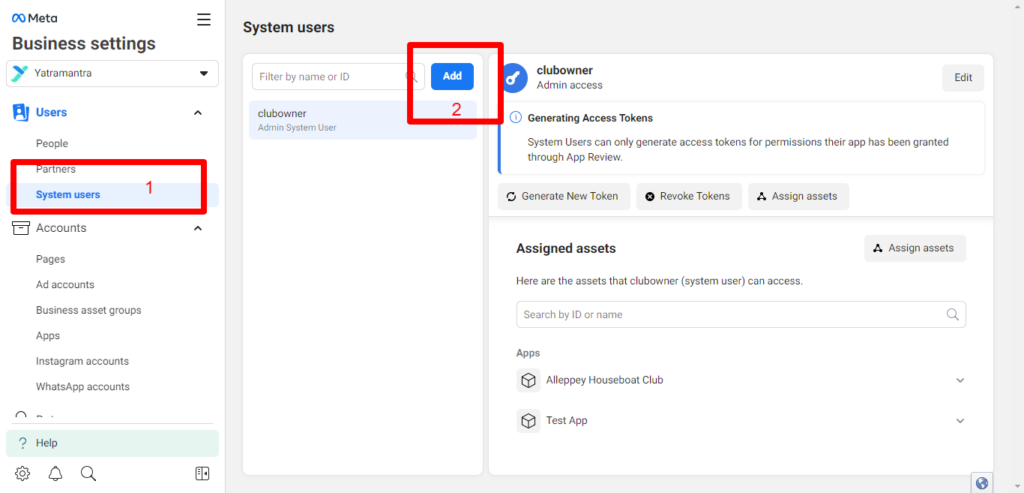
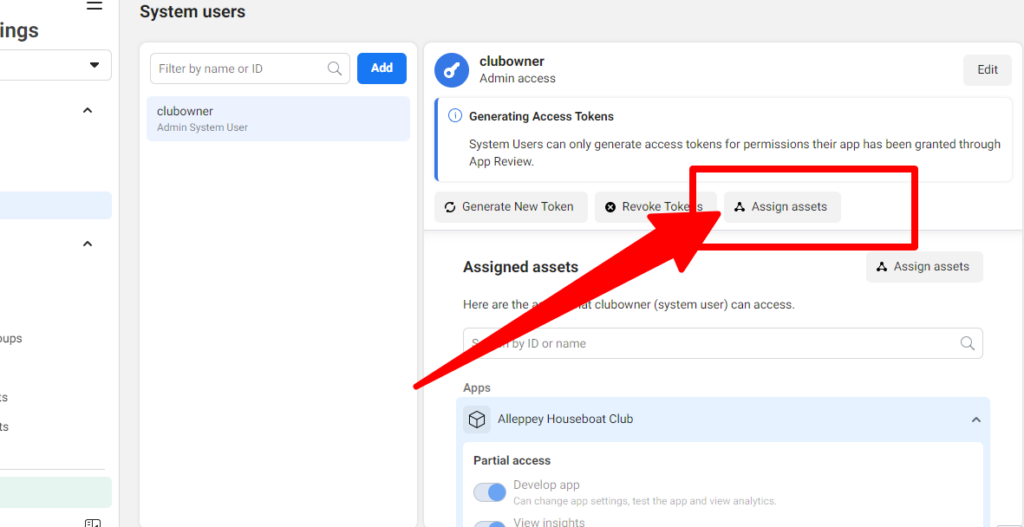
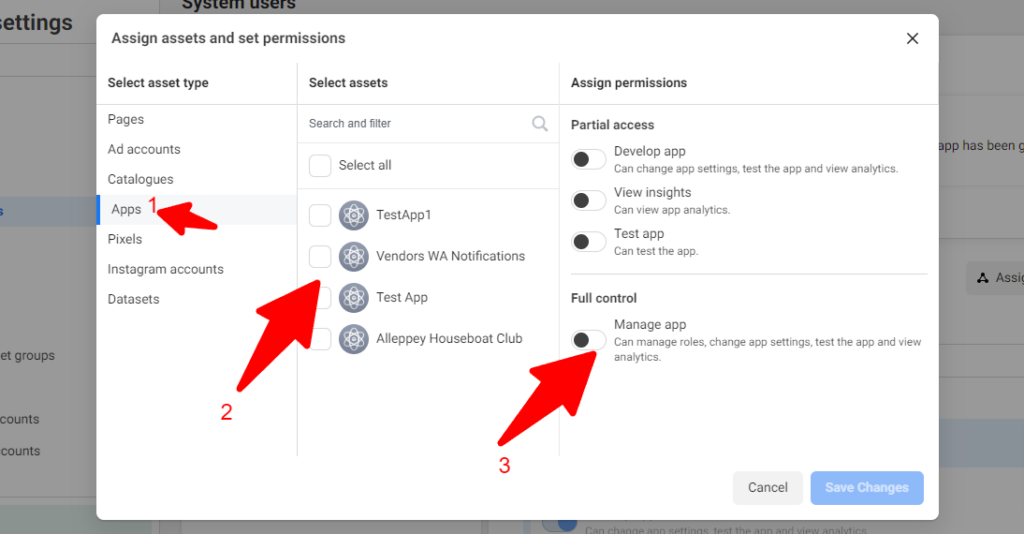
➑ Create a System User
➒ Generate a permanent token
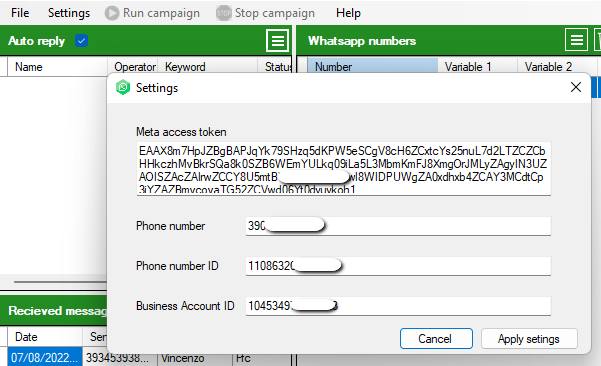
➓ Configure WinSender

1

Log in to Meta for Developers

Go to developers.facebook.com/apps and click Login in the top-right corner. Sign in with your personal Facebook account. If this is your first time, you will be asked to complete the developer registration: accept the terms and verify your account by email or SMS.

2

Create a new Meta App

In the dashboard, click Create App. Fill in the required fields: App name, for example “WinSender MyBusiness”, and App contact email.

Meta app creation screen - details

3

Select the WhatsApp use case

In the Use cases section, filter by “Business messaging” and select Connect with customers with WhatsApp. Then choose your Business Portfolio and click Go to Dashboard.

WhatsApp use case selection
Go to Dashboard

4

Complete the app settings

Before continuing, Meta requires you to complete the app’s basic settings. Go to App Settings → Basic and fill in at least:

  • Privacy Policy URL – the URL of your policy, for example a page on your website
  • Terms of Service URL – the URL of your terms
  • App Icon – a 1024×1024px icon

Meta app basic settings

💡 Tip: If you do not have a dedicated policy, you can temporarily use a link to your website or create a simple page. You can update it later.

5

Open the API Setup panel

From the left menu, go to Use cases → Customize, or directly to WhatsApp → API Setup. This is the central API configuration panel.

Use Cases - Customize

On this screen you will see the test number provided by Meta, which can be used immediately for free with up to 5 contacts, your Phone Number ID, and your WhatsApp Business Account ID (WABA ID). Write them down: you will need them later.

API Setup panel

6

Add a payment method REQUIRED

⚠️ 2024-2025 update: Meta now requires you to add a credit or debit card in order to use the API with real phone numbers. The card is not charged immediately, but it is required for activation. You will only start paying when your messages exceed the free allowance.

Still inside the API Setup section, click Add Payment Method and enter your card details. This unlocks the ability to send messages beyond the test sandbox.

Adding phone number and payment method

7

Register your real phone number

Click Add Phone Number in the API Setup panel. Enter the number with the international prefix, for example +39 3XX XXXXXXX, and choose the verification method: SMS or voice call. Enter the code you receive to complete verification.

✅ After verification, your number will appear in the “From” dropdown menu inside the API Setup panel. You will also see the updated Phone Number ID for your real number.

You can immediately send a test message using the Send message button in the panel to make sure everything works correctly.

8

⭐ Create a System User in Meta Business Manager

⚠️ Why this is essential: The token shown in the API Setup panel is temporary and expires every 24 hours. If you use it in WinSender, the software will stop working every day. For continuous use, you must create a permanent, non-expiring token through a System User.

Step 1: Go to Meta Business Settings → Users → System Users. Click + Add.

Meta Business Settings - Users System Users

Step 2: In the window that appears, choose a name, for example “WinSender Bot”, set the role to Admin, and click Create system user.

Creating an Admin System User

Step 3: Click Add assetsApps tab → select the app you created → enable Full control → Add assets.

Assigning app assets to the System User

Step 4: Go back to Add assetsWhatsApp Accounts tab → select your WABA → enable Full control → Add assets.

Assigning the WhatsApp Business Account to the System User

9

⭐ Generate the Permanent Token

From the System Users page in Business Settings, find the user you created and click Generate new token.

In the popup that appears:

  1. Select your App from the dropdown menu
  2. Set the expiration to Never
  3. Select the permissions:
    • whatsapp_business_messaging
    • whatsapp_business_management
  4. Click Generate token
🔴 IMPORTANT: The token is shown only once. Copy it immediately and save it in a safe place, for example a private text file. You will not be able to view it again: you can only generate a new one.

✅ You now have all the data required for WinSender:

  • Access Token → the permanent token you just generated
  • Phone Number ID → visible in the API Setup panel after selecting your number
  • WhatsApp Business Account ID → visible in the API Setup panel
  • Phone Number → your number with international prefix

10

Configure WinSender

Open WinSender on your PC, go to SETTINGS, and enter the four values collected in the previous steps:

🔑 Access Token
Permanent System User token

📞 Phone Number
Number with prefix, for example +39…

🆔 Phone Number ID
Numeric ID from the API Setup panel

🏢 Business Account ID
WABA ID from the API Setup panel

WinSender Settings screen

Click APPLY SETTINGS. If no error message appears, the connection has been completed successfully. 🎉

✅ WinSender is connected to the WhatsApp Cloud API. You are ready to send!

💰 WhatsApp Cloud API Pricing

Updated according to Meta’s pricing change of July 1, 2025.

📅 July 2025 change: from conversation-based pricing to per-message pricing

Since July 1, 2025, Meta has moved away from the old system that charged a fee for each 24-hour conversation window. Now each individual template message sent is billed separately, based on its category and the recipient’s country. Free-form messages and Utility templates sent during an active service window remain free.

🆓 What remains free

  • Free-form replies, including text, images, and audio, sent within 24 hours of the customer’s last message
  • Utility templates sent during an active Customer Service Window
  • All messages within 72 hours after a conversation started from a Click-to-WhatsApp ad

Template message categories

📣
Marketing
Promotions, offers, newsletters, campaigns
Paid
varies by country

🔧
Utility
Order confirmations, shipping updates, notifications
Reduced
free in open CSW

🔐
Authentication
OTP codes, identity verification
Reduced
volume discounts

💬
Service
Replies to received messages within 24 hours
FREE
inside the CSW

Indicative rates for Marketing messages, USD per message

CountryMarketingUtilityAuthentication
🇮🇹 Italy~$0.040~$0.008~$0.010
🇩🇪 Germany~$0.115~$0.013~$0.016
🇬🇧 United Kingdom~$0.038~$0.008~$0.009
🇺🇸 USA / Canada~$0.025~$0.004~$0.006
🇧🇷 Brazil~$0.0625~$0.008~$0.009
🇮🇳 India~$0.011~$0.001~$0.002

* Indicative rates, subject to change. Check the official Meta pricing page for updated values.

❓ Frequently Asked Questions

The token expires: what happens?

The temporary token from the API Setup panel expires every 24 hours. If you use it in WinSender, the software will stop working. That is why it is mandatory to use the permanent token generated through a System User, as explained in Steps 8-9 of this guide.

Can I use my personal mobile number?

Yes, but only if it is not already registered on WhatsApp. If it is, you must first delete that account from the mobile app, wait a few minutes, and then proceed with API registration.

How many messages can I send per day?

The initial limit is 1,000 unique contacts per day, also known as Tier 1. As you send messages and complete business verification, the limit increases automatically: Tier 2, 10,000 per day; Tier 3, 100,000 per day; and eventually unlimited.

Is it mandatory to add a credit card?

Yes. Since 2024, Meta requires a payment method in order to use real phone numbers and leave the sandbox. Nothing is charged until you exceed the free allowance, but the card must be added to unlock full access.

Does the official API really prevent bans?

Yes. Unlike unofficial methods that simulate WhatsApp Web, the Cloud API uses Meta’s official servers, eliminating the risk of bans caused by automation. However, you must still comply with the WhatsApp Business policies: no spam and explicit opt-in from contacts.

Need help?

If you experienced problems during setup or want to learn more about WinSender, our team is available to help.

📩 Contact Support